
G-Squared Boat Neck Top Free Crochet Pattern
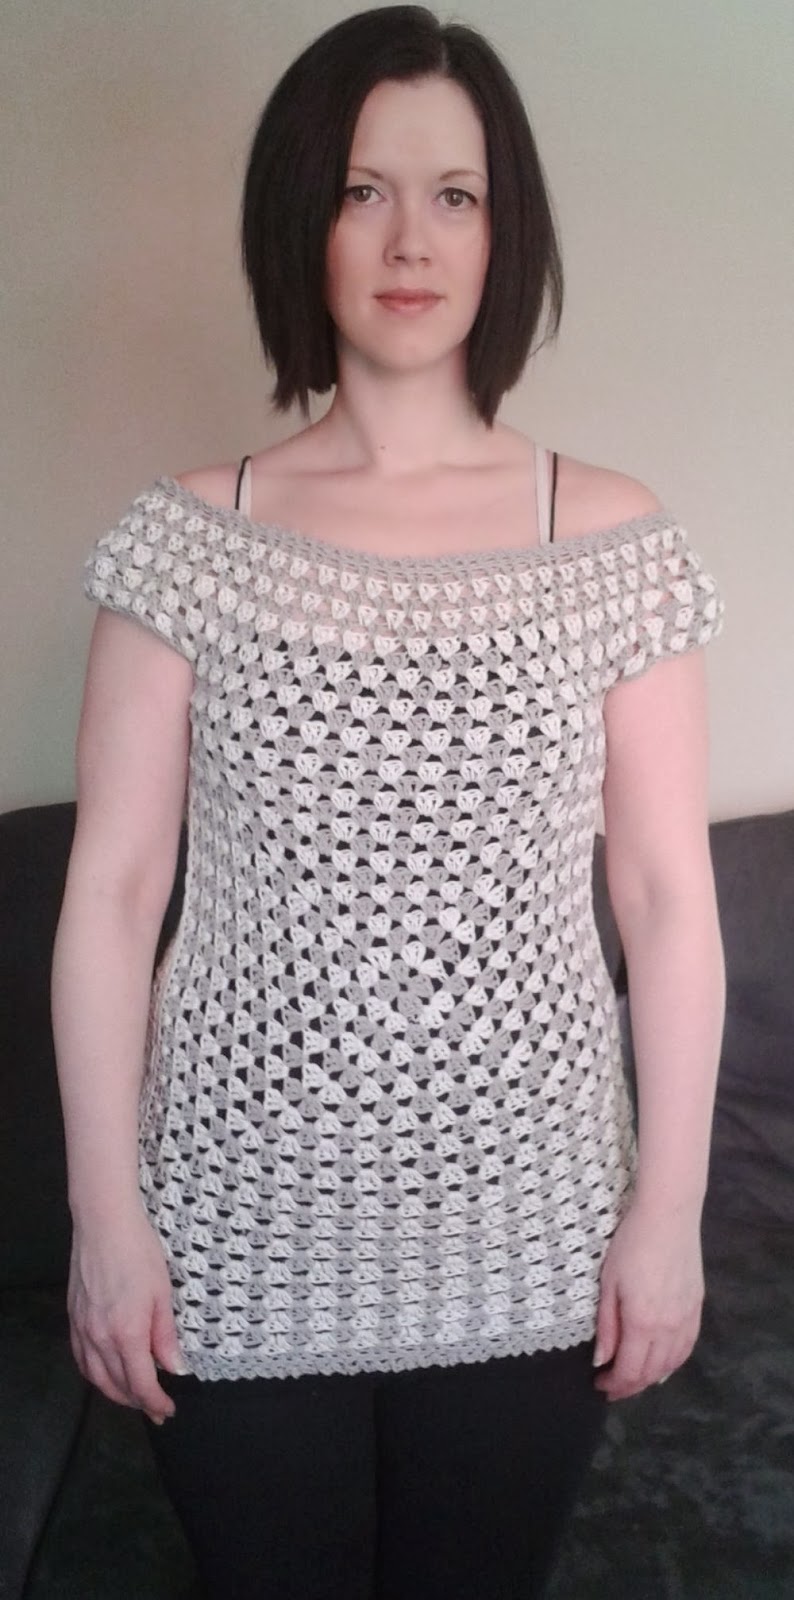
Here’s one of my new spring/summer 2014 patterns! It is fun and the color variations are endless! Make it all one color, or spice it up with your favorite shades. Comfortable and stretchy, I used a lightweight yarn with a larger than suggested hook size, keeping the upcoming warmer weather in mind! I used 2 colors, white and steal grey, but this would look great in any color combo, I don’t think you could go wrong. You could even use several colors, not just two colors!
This is a pattern from my actual spring/summer collection. I am giving it away to my loyal followers for
free. Please do not copy my pattern, sell
my pattern, or the finished product online.
I sell finished work online, you’d be therefore in direct competition
with me, and it is against my copyright.
HOWEVER, I do not mind you making this for personal use, or for selling
at live crafting events or markets in your area.


Designed By: Farrah
for 365 Crochet
Skill Level: Intermediate
 Yarn: Bernat Cotton-ish 70 gram (2.4oz) 282 yards; Yarn Size= Light “3” I used 3 skeins, 2 white and 1 grey. You may need to grab an extra skein for
larger sizing, but you won't use it all.
Yarn: Bernat Cotton-ish 70 gram (2.4oz) 282 yards; Yarn Size= Light “3” I used 3 skeins, 2 white and 1 grey. You may need to grab an extra skein for
larger sizing, but you won't use it all.
Hook: Size 5.0mm “H”
Size: (measuring
around waist in inches) Small=28, Medium=30, Large=32, Extra Large=34. Size changes are in parenthesis; (S, M, L,
XL)
Gauge: Make a granny
square with 2 rounds (6dc down each side) This square should measure
approximately 2 inches across.
Stitches Used:
Ch=chain
Sc=single crochet
Dc=double crochet
Sl st=slip stitch
Fsc=foundation single crochet
Special Term Used:
Shell= 3dc cluster in one space
Now let’s get started!
MAKE A GRANNY SQUARE
(I started with grey, and alternated with white, switching color on
every row)
Don't know how to make a granny square? Click here-how to make a granny square.
Small Size Only: Work
14 rounds (you will have 42dc down each side of the square) Fasten off leaving a long 25 inch tail (you
will need it for sewing a seam)
Medium Size Only: Work 16 rounds (you will have 48dc down
each side of the square) Fasten off leaving a long 25 inch tail (you will need
it for sewing a seam)
Large Size Only: Work
18 rounds (you will have 54dc down each side of the square) Fasten off leaving
a long 25 inch tail (you will need it for sewing a seam)
Extra Large Size Only:
Work 20 rounds (you will have 60dc down each side of the square) Fasten
off leaving a long 25 inch tail (you will need it for sewing a seam)
NOW MAKE ANOTHER GRANNY SQUARE! (I made my next one all in
white)

Sew the granny squares together: Using the long tails of yarn; line up your two granny squares, right sides facing outward, making sure you have a yarn tail on each side; evenly sew up the sides. This creates the only seam in your shirt.

Top of shirt
Round 1: Join yarn with
a sc to top right corner (ch2 space) of front panel, ch2 (counts as dc), 2dc in
same space; *Shell in space between next
two shells* (13, 15, 17, 19) times; shell
in next ch2 space (left corner of front panel);


ARMHOLE: fsc 35 (How to make a fsc?); (being careful not to twist the chain);

shell in next ch2 space (right corner
of back panel); *shell in space between next two shells* (13, 15, 17, 19)times;
shell in next ch2 space (left corner of back panel);
ARMHOLE: fsc 35, sl st in 2nd ch of beginning ch2. Sl st in next 2 dc.
Rnd 2: Sl st in space
between 1st and last shell of rnd 1; ch3 (counts as 1dc) 2dc in same
space; *shell* (13, 15, 17, 19) times; skip nest shell, 3dc in 1st fsc
of arm, (skip next 2fsc, 3dc in next fsc) 11 times; shell across back side (14,
16, 18, 20) times; skip next shell, 3dc in 1st fsc of fsc of arm;
(skip next 2fsc, 3dc in next fsc) 11 times; sl st in 3rd ch of
beginning ch3.

Rnd 3: Sl st in space
between 1st and last shell of rnd 2; ch3, 2dc in same space; *shell*
around top (51, 55, 59, 63) times, sl st in 3rd ch of beginning ch3.
Rnd 4: Sl st in space
between 1st and last shell of rnd 3; ch3, 2dc in same space; *shell*
around top (51, 55, 59, 63) times, sl st in 3rd ch of beginning ch3.
Rnd 5: Sl st in space
between 1st and last shell of rnd 4; ch3, 2dc in same space; *shell*
around top (51, 55, 59, 63) times, sl st in 3rd ch of beginning ch3.
Rnd 6: Sl st in space
between 1st and last shell of rnd 5; ch3, 2dc in same space; *shell*
around top (51, 55, 59, 63) times, sl st in 3rd ch of beginning ch3.
Rnd 7: Sl st in space
between 1st and last shell of rnd 6; ch3, 1dc in same space; *2dc in
next space between shells* (51, 55, 59, 63) times, sl st in 3rd ch
of beginning ch3.
Rnd 8: Sl st in space
between 1st and last 2dc’s of rnd 7; ch3, 1dc in same space; *2dc in
next space between 2dc’s* around (51, 55, 59, 63) times.
Rnd 9: Sl st in space
between 1st and last 2dc’s of rnd 8; ch3, 1dc in same space; *2dc in
next space between 2dc’s* around (51, 55, 59, 63) times.
Rnd 10: Sl st in
space between 1st and last 2dc’s of rnd 9; ch3, 1dc in same space;
*2dc in next space between 2dc’s* around (51, 55, 59, 63) times.
Rnd 11: Sl st in
space between 1st and last 2dc`s of rnd 10; ch3 (counts as 1dc),
*2dc in next space between 2dc`s, 1dc in next space* (25, 27, 29, 31) times;
2dc in last space; sl st to 3rd ch of beginning ch3.

Rnd 12: Ch1, sc in
each dc around (78, 84, 90, 96) times.
Fasten off.... maybe
Optional: I added a
lace border to mine, by: (ch3, sl st in
next st) repeated all of the way around.
You could also add berry stitches, popcorns, puff stitches, or crab
stitches to fancy it up, or leave it as is; simple.
Bottom of Shirt
If you are happy with the length at this point – just add a
finish edge, attach yarn to any bottom corner, and work a round of sc all of
the way around.
Or
If adding length— Rnd 1: Attach yarn to bottom corner ch2 space (with
shirt turned upside down), ch3 (counts as 1dc) 2dc in same space; work shells
across (like you did on the top), until you get to the next ch2 corner space,
3dc in that space, 3dc in the next ch2 corner space, continue to shell around
until the last ch2 corner space, 3dc in that space, sl st to top of beginning
ch3;
Rnd 2 and on): sl st
in space between 1st and last shells of previous rnd; 2dc in same
space; work shells around bottom, sl st to 3rd ch of beginning ch3.
Continue to do this until you are happy with the length.
Finish edge: ch1, sc
in each dc around, sl to to 1st sc, fasten off.
Or add a fancy edge like the top. Here you can even add a ribbed edge!


What size pattern did you use in your pictures?
ReplyDeleteI made a size medium:)
ReplyDeletehow do i make the shoulder cover more? ideas
ReplyDelete