
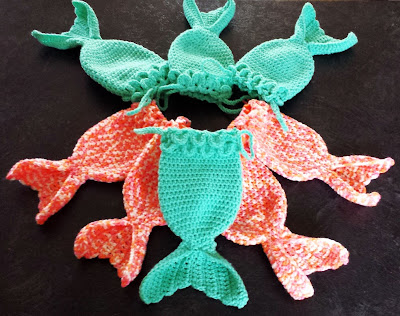
Dragon Scale Armour Boot Cuffs -free crochet pattern-

If you still haven't learned how to make the crocodile stitch, now's a great time! I've been making these for a holiday craft show coming up soon, so by now I have the pattern memorized. However, I'd love to share it with you, because it's quick and pretty easy; don't let those complicated looking stitches scare you away. Once you learn the crocodile stitch, you'll be designing your own patterns! (btw, the crocodile stitch makes a great mitten or glove cuff!) I only included one size for these cuffs, however they do stretch quite a bit, but if you'd like them smaller or larger, you may adjust your hook size. So here's my pattern, enjoy!
Designed By: Farrah Hodgson (Firene Designs)
Skill Level: Intermediate
Materials:
- Worsted Weight Yarn of your choice (Medium, 4) about 180 yards. (I used Ice Yarn, Brico Wool, two 50 g balls)
- Size 5.00mm/H crochet hook
- yarn needle to sew in ends
Finished Measurements: 6 inches wide at top (laying flat) or 12" circumference; 5.5" long.
Gauge: (Over pattern) along ribbed cuff; 12 sts and 8 rows = approx. 2 inches square
Stitches Used:
- Ch=Chain
- Sl St= Slip Stitch
- Sc=Single Crochet
- Dc=Double Crochet
- Rsc=Reverse Single Crochet (Crab St)
- Croc st=Crocodile Stitch (described and shown in pattern)
~Copyright~
All Rights Reserved. No part of Firene Designs patterns may be reproduced, copied, modified or adapted, without the prior written consent of the author, unless otherwise indicated. You may: Link to this pattern via Social Media, use cover shot photo of completed pattern for linking purposes, sell the finished item. For any other mode of sharing, please contact the author.
PATTERN
-----Ribbed Cuff-----
Ch 13
Row 1: Sc in 2nd ch from hook, sc in next 11 chs.
-working in back loops for remainder of section-
Rows 2-40: Ch1, turn; sc in next 12 sts.
Row 41: (join) Ch1, fold band so that row 40 is in front of row 1; sl st next 12 sts of both rows together. Do not fasten off.
-----Dragon Scales-----
Turn band inside out, this is now the right side.
Rnd 1: Ch1, -working along the ends of each band row, work (sc in next 4 spaces, 2sc in next space) 8 times. (=48sc)
Rnd 2: Ch3, dc in same st, skip 2 sts, (dc-ch1-dc) in next st, *skip 2 sts, 2dc in next st, skip 2 sts, (dc-ch1-dc) in next st** 7 times, skip last 2 sts, sl st in 3rd ch of beginning ch3 to join.

Rnd 3: Ch1, *croc st (working downward- work 5dc over front post of 1st dc, working upward- work 5dc over front post of second dc) over next 2 dc, sl st in next ch1 space** 8 times, sl st in beginning ch to join. **See photos below for help
 |
| work 5dc over front post of 1st dc |
 |
| work 5dc over front post of second dc |
Rnd 4: (Track) Ch3, dc in same st as join, (dc-ch1-dc) in center of next croc st, *2dc in next sl st (between croc sts), (dc-ch1-dc) in center of next croc st** 7 times, sl st in 3rd ch of beginning ch3 to join.

Rnds 5/6: Repeat Rnds 4 and 3
Rnds 7/8: Repeat Rnds 4 and 3
Rnds 9/10: Repeat Rnds 4 and 3
Rnds 11/12: Repeat Rnds 4 and 3
Rnd 13: Ch1, sc in same st as join, (work a sc along the top edge of first dc of croc st, 2sc in center of croc st, work a sc along top edge of last dc of croc st, 2sc in next sl st) 7 times, work a sc along top edge of 1st dc of last croc st, 2sc in center of croc st, work a sc along top edge of last dc of croc st, sc in last ch, sl st in 1st sc to join. (48sc)

Rnd 14: Ch1, sc in next 48 sts, sl st in 1st sc to join.

Rnd 15: (optional) Ch1, working backwards, rsc in each st, sl st in 1st st to join. Fasten off. Sew in ends.

 |
| feet "selfy" |


Thank you for this pattern I am definitely making these for my mum, who also has fingerless gloves in this crocodile stitch (I didn't make them!).
ReplyDeleteIs this pattern written in US or UK terms?
ReplyDeleteIt's written in American terms!
Delete