
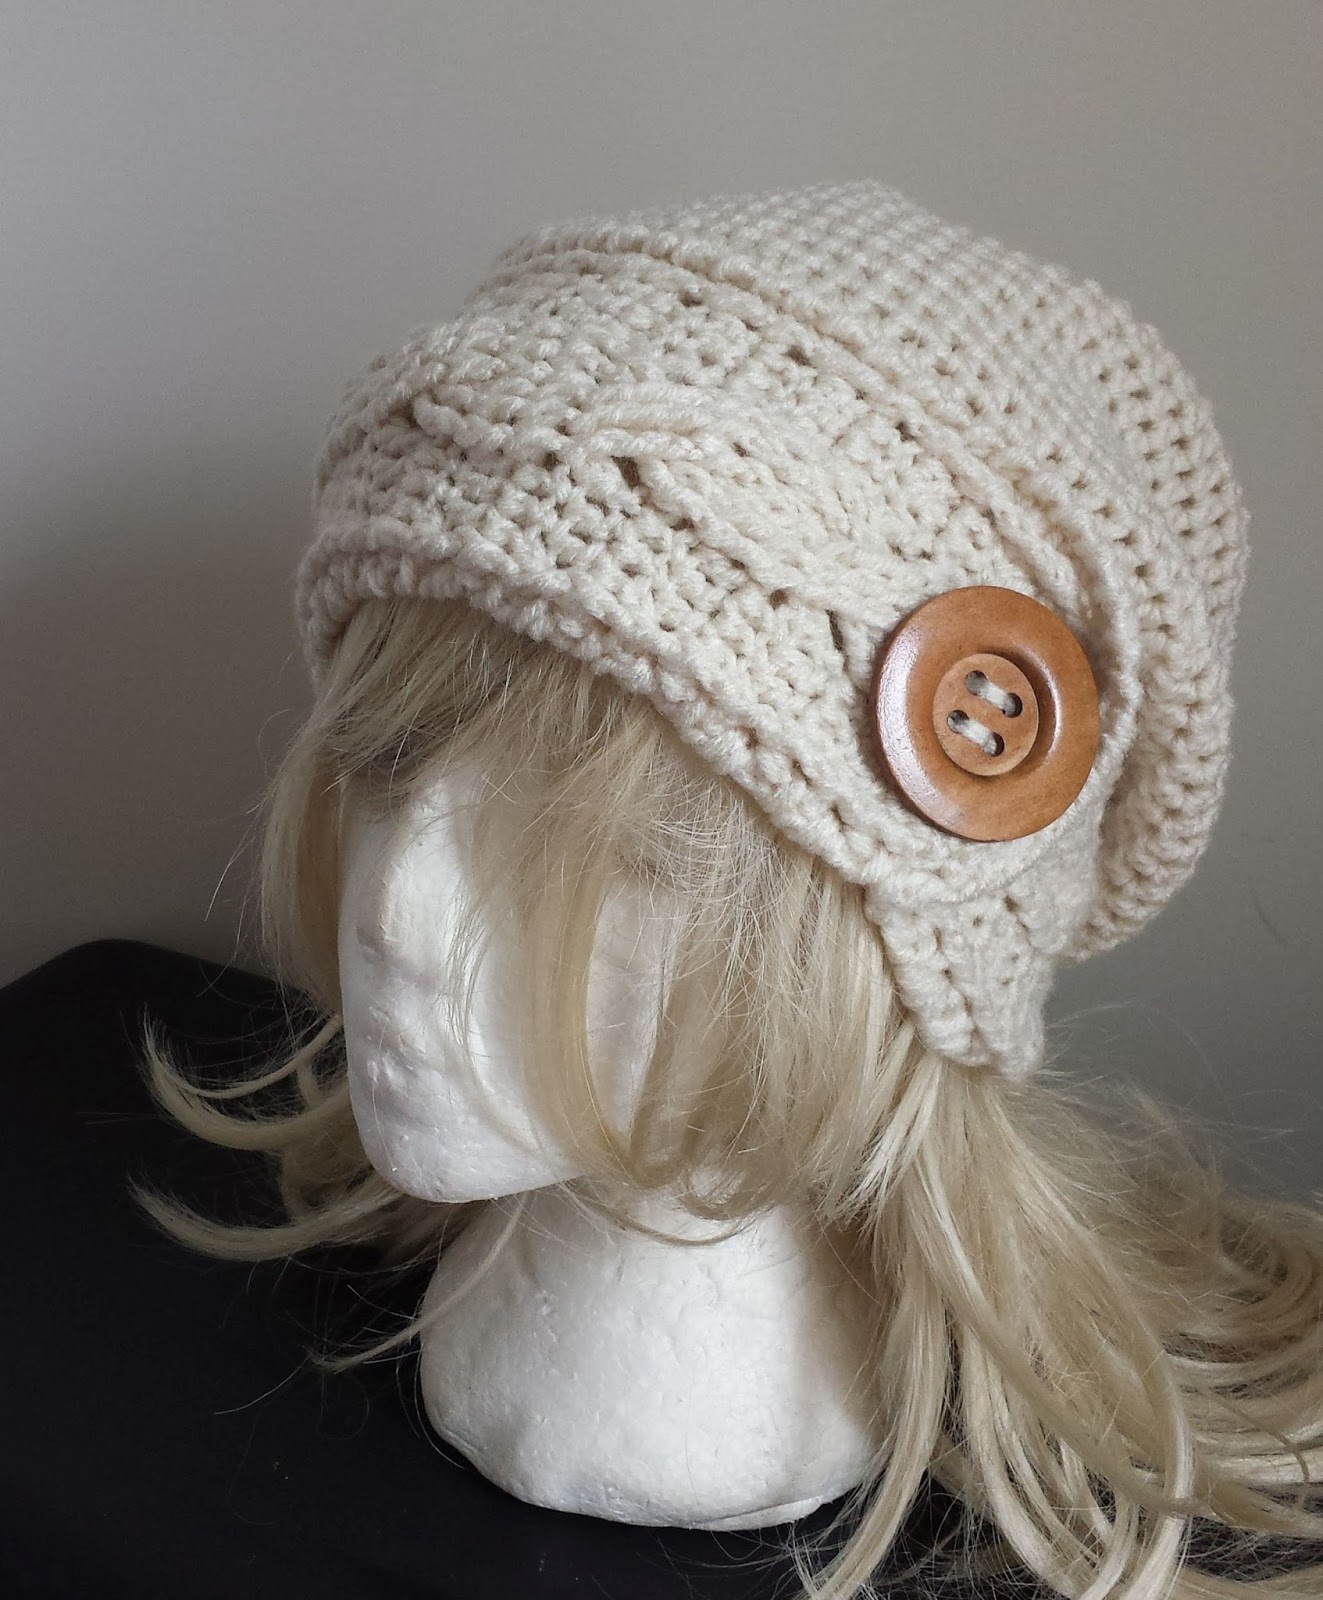
Cabled Headband Hat w/big Button -free crochet pattern-

Here it is, my version of the crochet cabled headband slouchy hat with a great big button! I've been making this hat for over two years now, and it's still my top seller at local craft fairs, markets, and custom orders. I've honestly been making it free form and from memory, but recently decided to actually write it down so that I can share it with you. It's a very cute hat, and only requires knowledge of the basic stitches, plus the crab stitch (otherwise known as rsc - reverse single crochet) and working over post stitches. The highlight of this hat, really, is the giant button. You can find them in all sorts of places, but I buy mine online from a Canadian (because I'm in Canada and shipping is faster to me) yarn company called knitca.com
Designed By: Farrah Hodgson
Skill Level: Intermediate
Materials:
- 1 ball of Loops & Thread Impeccable; color Soft Taupe used in pattern; 277 yds/253 m; 4.5 oz/127.5g (or similar)
- *Note: I usually use Red Heart Super Saver, but this yarn was on sale, so I gave it a shot :)
- Crochet Hook Size 4.0mm (G/6)
- Crochet Hook Size 5.5mm (I/9)
- 1- 50mm button
- Yarn Needle for sewing ends
Size: Fits Teen/Adult head
Finished Measurements: Hat- 11 inches long; 10 inches wide; headband 4 inches wide
Gauge: With Crochet Hook 4.0mm (G/6); 16dc by 8 rows = 4 inches
Stitches Used:
- Ch=Chain
- Sc=Single Crochet
- Hdc=Half Double Crochet
- Rsc= Reverse Single Crochet (crab st)
- *tog= crochet next 2 sts together to decrease
- Fpdtr=Front Post Double Treble (yarn over 3 times)
- Fpdc = Front Post double crochet
- Bpdc=Back Post double crochet
 |
| My most popular color (Red Heart Super Saver, color Aran) |
THE PATTERN!
HEADBAND
Pull yarn approximately 12 inches to leave a long beginning tail (use for sewing button later)
Ch 19
Row 1: Dc in 4th ch from hook, dc in next 15 chs.
Row 2: Ch3 (counts as 1dc), turn; fpdc over next st, dc in next 3 sts, fpdc over next 3 sts, dc in next st, fpdc over next 3 sts, dc in next 3 sts, fpdc over next st, dc in last st.

Row 3: Ch3 (counts as 1dc), turn; bpdc over 1st post st, dc in next 3 sts, bpdc over next 3 post sts, dc in next st, bpdc over next 3 post sts, dc in next 3 sts, bpdc over next post st, dc in last st.

Row 4: (CABLE ST) ch3 (counts as 1dc), turn; fpdc over 1st post st, dc in next 2 sts, dc2tog over next 2 sts,(note: to close gap) skip over first 3 post sts and the 1dc- fpdtr over next 3 post sts, dc back in skipped dc, fpdtr in first 3 skipped posts, dc2tog over top of last post st and next st, dc in next 2 sts, fpdc over next post st, dc in last st.
 |
| Help Note: dc2tog over the next dc and the next "post st" but not working over the post, but into the actual stitch. This dc stitch will be worked again in the cable, but over the post next time. |


 |
| Help Note: The "top of last post st" means to crochet into the actual stitch, not the post of the stitch (which was already worked in the cable) this stitch gets worked twice, over the post in the cable, and in the actual stitch as part of the dc2tog. |
Row 5: Ch3 (counts as 1dc), turn; bpdc over 1st post st, dc in next 3 sts, bpdc over next 3 post sts, dc in next st, bpdc over next 3 post sts, dc in next 3 sts, bpdc over next post st, dc in last st.
Row 6: Ch3 (counts as 1dc), turn; fpdc over 1st post st, dc in next 3 sts, fpdc over next 3 post sts, dc in next st, fpdc over next 3 post sts, dc in next 3 sts, fpdc over next post st, dc in last st.
Row 7: Ch3 (counts as 1dc), turn; bpdc over 1st post st, dc in next 3 sts, bpdc over next 3 post sts, dc in next st, bpdc over next 3 post sts, dc in next 3 sts, bpdc over next post st, dc in last st.

Rows 8-11: repeat rows 4-7
Rows 12-15: repeat rows 4-7
Rows 16-19: repeat rows 4-7
Rows 20-23: repeat rows 4-7
Rows 24-27: repeat rows 4-7
 |
| half way there |
Rows 28-31: repeat rows 4-7
Rows 32-35: repeat rows 4-7
Rows 36-39: repeat rows 4-7
Rows 40-43: repeat rows 4-7
Rows 44-47: repeat rows 4-7
Row 52: Ch1, turn; sc2tog, sc in next 3 sts, fpsc2tog, fpsc over next 3 sts, fpsc2tog, sc in next 3 sts, sc2tog.
Row 53: Ch1, turn; (sc2tog) 3 times, sc in next st, (sc2tog) 3 times.
Row 54: Ch1, turn; sc2tog, sc in next 3 sts, sc2tog. DO NOT FASTEN OFF!

BORDER
Switch to larger hook (5.5mm I)
With right side facing,
Row 1: Work a sc at each of the edges (ends) of last 2 rows;

-working along the edge spaces (of dc and ch3 at beginning and ends of the rows); (sc in next side space, 2sc in next sp) along the row ends, sc in last space. (78sc)

Row 2: Ch1, working backwards; rsc in front loops only for next 70 sts;

rsc through both loops next 8 sts, continue to rsc along edge next 5 sts, working along opposite side, work a rsc in each next 2 end of rows;

(2rsc in next sp, rsc in next sp) along row ends, 2sc in last sp, (78rsc);

continue up edge..... ch1, turn (wrong side facing) (skip next st, bpsc over next st) 8 times, sl st in 1st rsc loop. DO NOT FASTEN OFF!

HAT
Rnd 1: Turn; fold band over, right side facing, and begin in 1st back loop of the rsc sts, sc in next 70 sts. do not join.

-working in continuous rounds....
Rnd 2: (hdc in next 6 sts, 2hdc in next st) 10 times. (80hdc)

Rnds 3-12: hdc in next 80 sts. do not join.
Rnd 13: decrease (hdc x 6, hdc2tog) 10 times. (70hdc)
Rnd 14: decrease (hdc x 5, hdc2tog) 10 times. (60hdc)
Rnd 15: decrease (hdc x 4, hdc2tog) 10 times (50hdc)
Rnd 16: decrease (hdc x 3, hdc2tog) 10 times. (40hdc)
Rnd 17: decrease (hdc x 2, hdc2tog) 10 times. (30hdc)
Rnd 18: decrease (hdc x 1, hdc2tog) 10 times. (20hdc)
Rnd 19: decrease (hdc2tog) 10 times. (10hdc)
Rnd 20: decrease (sc2tog) 5 times. (5sc)
Fasten off! Sew in ends.
Sew large button onto headband of hat with the very beginning tail of yarn.
*Note: The button is purely decorative, it does not fasten into a hole.

 |
| Camo! (Red Heart Super Saver) |
 |
| acting silly with my mannequin head form :D |

Thank you for the lovely hat pattern. Very much appreciated!
ReplyDeletethis pattern is very nice thanks for providing it for free love the pictures with it i am still a beginner and with the pictures it made it very easy to understand the written pattern, thanks again i can see myself making many of these as gifts
ReplyDeleteThank you so much! This hat is gorgeous ! I just finished mine and may not ever take it off!
ReplyDeleteThis looks like a great pattern! Do you allow others to sell the hats they make from it?
ReplyDeleteAbsolutely :) I only hold rights of the pattern itself, you can make and sell as much finished product as you wish!
DeleteAwesome! Thank you so much! This has to be the most gorgeous slouchy hat pattern I've seen!
DeleteI am having trouble on row 3 cable stitch where you dc2together top of post, by chance do you have a YouTube video?
ReplyDeleteI don't have any videos yet, but I will try to clarify...
Delete"dc2tog over next 2 sts" You dc2tog over the next dc (where normally you would just work 1dc), and the 1st post st. But instead of working over the post, you are working into the actual stitch. This stitch gets worked twice; after it becomes part of the 2dctog, you then work back over the post of the same stitch when you are cabling.
When you get to the other side of the cable, you do the same thing, just in reverse, dc2tog over the last worked dc (you already worked over the post in the cable) and the next dc.
All this does, is close up a gap in the finished cable. If you prefer to do it the regular way and don't mind a bit of a gap, you can just do this...
Row 3: (CABLE ST) ch3 (counts as 1dc), turn; fpdc over 1st post st, dc in next 3 sts, skip over first 3 post sts and the 1dc- fpdtr over next 3 post sts, dc back in skipped dc, fpdtr in first 3 skipped posts, dc in next 23 sts, fpdc over next post st, dc in last st.
Hope that helps you out!
last line--- "dc in next 3 sts (not 23!) typo :)
DeleteNice pattern. There are two rows marked Row 2
ReplyDeleteyes, there is :D Thanks for pointing that out, I will fix. :) Thanks!
DeleteI'm having a problem understanding the border. I can't come up with 78 sc's since I can't quite figure row 1 out. Can someone please help????
ReplyDeleteRow 1: Work a sc at each of the edges of last 2 rows;
Delete-The last 3 rows of the headband, were worked in sc's instead of dc's, so you're just working a sc along the ends of those rows. Where you end at the headband, it takes care of that last sc row, (there's 3) so just work a sc in each of the next two.
-Then the ends or edges along the headband (where each row began or ended and turned) will either be a dc stitch or a ch3 stitch, you are working into these ch3/dc spaces.
To be honest, it really doesn't matter if you get exactly 78 sts, close to that is fine! It will not impact the design whatsoever, any stitches beyond 70 will be part of the button flap, a stitch or two off will not be noticeable.
I hope that helps!
I am also stuck on this part. I'm still not getting it. We're at the end of the headband and I don't know where to go from there
DeleteThis comment has been removed by the author.
DeleteIm so lost once it gets to the hat part. I did the rsc how it stated but when you say to have right side facing up and first stitch back loop im at the more squared end of the head band to i connect the to to move forwards?
ReplyDeleteIm with you. Im not understanding how to connect or where to connect to start the hat part. I have it folded over, but not sure if im supposed to be back post single crocheting or if im supposed to just regular single crochet OVER the rscs? Totally lost! lol
DeleteYes, you should be at the square end of the headband. Remember when you worked 70 rsc, in the front loops only, then the rest were in both loops. Right side facing, skip those full rsc stitches, and the 1st hat stitch (and the rest of the rnd) is in the back loops of the 1st border rnd. This will join the headband around. Look at the picture from rnd 1 of the hat. It shows this 1st st being joined.
DeleteThis comment has been removed by the author.
ReplyDeleteThis comment has been removed by the author.
DeleteYeah Im completely lost beginning the hat part. I ended at more squared off section, then turn to right side is facing and fold over like in the picture..but now dont understand exactl where to join it? Am I going over the rsc stitches? Am i supposed to bpsc in the next 70, like behind the rscs? Totally lost on how to start or connect this part! Thanks!! :-)
ReplyDeleteyou are working (sc) in the remaining back loops from the 1st border rnd. That's why you've only rsc 'd in the front loops of those 70 sts on the 2nd rnd.
DeleteOh my gosh, cant believe I did not get that. Thank you so very much! Totally understand now! :D
Delete:)
DeleteThis comment has been removed by the author.
ReplyDeleteIt just means to do a regular rsc through those sts (instead of just the back loops like the last 70)
Deletewhat is the length of your headband? My measurements are coming out completely different. Also 1-54 seems very long.
ReplyDeletehave you checked your gauge? The headband should be long enough to go around your head plus a bit of overlap.
DeleteThe gauge is correct, I adjusted the length to my head measurements and I have a rather big head. The headband width is the same also. I loved the look of the rsc so I continued it all around the band instead of just on top. I also deleted the extra dc in between the posts. It kept becoming tangled when doing the cable. Thank you for the free pattern. Do you have any more that are free?
DeleteThank you for sharing!! Your work is impeccable! I love giving people my crocheted things as each one is crocheted with love in the stitches. Every female in my family daughter granddaughter and my siblings girls my nieces all got messy bun beanies or hooded scarves , hooded cowls , depended on age and looks.. lol I enjoy customizing because no they know it's made just for them ;, like I say~ with love in each stitches. I put a tag in that says''Hand Made by Loving Stitches just for you !
ReplyDeleteI forgot to put in, they got them for Christmas lol
ReplyDeleteThis comment has been removed by the author.
ReplyDeleteThanks so much for posting this lovely pattern. I'd never made anything more complicated than a coaster, but this came out great for me! Such a beautiful hat; I'm going to make more as Christmas presents!
ReplyDeleteHi! This pattern is written in American terms :) Thank you for the kind words!
ReplyDeleteCUTE hat! Easy to read instructions! Thank you so much!
ReplyDeleteI am completly lost trying to do the cabel stitch. I am stuck on row 5. Please help
ReplyDeleteWhen i try to cross them again, it does not cross.
DeleteThis comment has been removed by the author.
ReplyDeleteThis comment has been removed by the author.
ReplyDeleteAfter completing round 4, the cable part on the next 4 rounds is not coming out crisscrossed. It’s making like a long parenthesis ( ) type design, what am I doing wrong?
ReplyDelete*Update* I “really” figured it out this time....when I was doing round 4, after the first fpdtr, I did the DC behind, but I was also doing the fpdtr in the back from the skipped 3, lol. Now that I fixed that and crocheted the fpdtr in the front of the skipped 3 stitches, it now is forming the crisscross!! Persistence...haha
ReplyDeleteFarrah....could you possibly help out in directing me how to do this in a child’s size, like for a 6 yr old? Thanks
ReplyDeleteOkay, i’m gonna try one more time...does anyone know how to get the pattern designers attention? I’m not getting any type of response. I really would like some guidance on how to do this pattern for a child’s size...age 6. The pattern designer has seem to stop responding? I have no idea of any other way to contact other than in here?? Please help. I got a request for child’s size and I do not know how to change pattern. TIA
ReplyDeleteGreat Pattern!!!! Thank you... this hat is absolutely lovely and fun to make!!☺️
ReplyDeleteIt says to use 2 hooks.. do I use G for the headband part and I for the hat?
ReplyDeleteNevermind, use G throughout and I at the borders.
DeleteYes, Really very good information, this information is excellent and needy for everyone. I am very thankful to you for providing this kind of knowledge. Thanks once again for sharing it. Captain Tractor
ReplyDeleteNice Information, You provided valuable data for us. I am thankful to you for providing this kind of information.
ReplyDeleteVery Good Information...Thanks for sharing this kind of information.
ReplyDeleteAmazing Post..!!
ReplyDeleteGreat content, thanks for sharing good post.
ReplyDelete
ReplyDeleteIt was such a good post. Visit black bikini set. Thanks for sharing.
This blog is completely informative and productive in nature. Thanks once again for sharing it.
ReplyDeleteMahindra 575
Muchas gracias por compartir! Esta muy bonito
ReplyDeletehatay evden eve nakliyat
ReplyDeleteısparta evden eve nakliyat
erzincan evden eve nakliyat
muğla evden eve nakliyat
karaman evden eve nakliyat
OROJA
urfa evden eve nakliyat
ReplyDeletemalatya evden eve nakliyat
burdur evden eve nakliyat
kırıkkale evden eve nakliyat
kars evden eve nakliyat
VOCHE8
C395A
ReplyDeleteIsparta Evden Eve Nakliyat
Artvin Şehir İçi Nakliyat
Mamak Fayans Ustası
Muş Şehir İçi Nakliyat
Osmaniye Parça Eşya Taşıma
Tekirdağ Şehir İçi Nakliyat
Niğde Parça Eşya Taşıma
Kayseri Şehir İçi Nakliyat
Ankara Fayans Ustası
EF515
ReplyDeleteBibox Güvenilir mi
Bursa Lojistik
Çerkezköy Halı Yıkama
Çerkezköy Televizyon Tamircisi
Mexc Güvenilir mi
Isparta Evden Eve Nakliyat
Van Evden Eve Nakliyat
Elazığ Şehirler Arası Nakliyat
İstanbul Lojistik
B0AB7
ReplyDeleteCoinex Güvenilir mi
Erzincan Lojistik
Urfa Şehirler Arası Nakliyat
Adana Şehir İçi Nakliyat
Mardin Parça Eşya Taşıma
Kilis Şehir İçi Nakliyat
Çanakkale Şehir İçi Nakliyat
Niğde Parça Eşya Taşıma
Gümüşhane Lojistik
2D934
ReplyDeleteHuobi Güvenilir mi
Aksaray Evden Eve Nakliyat
Bybit Güvenilir mi
Afyon Lojistik
Çanakkale Şehirler Arası Nakliyat
Silivri Çatı Ustası
Bitranium Coin Hangi Borsada
Bursa Parça Eşya Taşıma
Arg Coin Hangi Borsada
6D7AF
ReplyDeleteAdana Lojistik
Niğde Lojistik
Ünye Boya Ustası
Konya Evden Eve Nakliyat
Çorum Şehirler Arası Nakliyat
Çerkezköy Fayans Ustası
Eryaman Parke Ustası
Etimesgut Boya Ustası
Mardin Şehirler Arası Nakliyat
8EA5C
ReplyDeleteBayburt Parça Eşya Taşıma
Hakkari Evden Eve Nakliyat
Sivas Şehirler Arası Nakliyat
Kırıkkale Lojistik
Ceek Coin Hangi Borsada
Hexa Coin Hangi Borsada
Altındağ Boya Ustası
Osmo Coin Hangi Borsada
Çankırı Parça Eşya Taşıma
6BAA5
ReplyDeleteKripto Para Nedir
Referans Kimliği Nedir
Bibox Güvenilir mi
Muğla Evden Eve Nakliyat
Çankaya Boya Ustası
Bybit Güvenilir mi
Etimesgut Fayans Ustası
Bitexen Güvenilir mi
Silivri Boya Ustası
887B0
ReplyDeleteresimli Magnet
4B486
ReplyDeletesightcare
3A40A
ReplyDeletetelegram kripto para grupları
binance referans kimliği nedir
kaldıraç ne demek
bitcoin hesabı nasıl açılır
probit
kripto para nasıl alınır
bybit
coin nasıl alınır
bitcoin seans saatleri
I really like your style as well as your art. It's really amazing to show my blog too. please click on this link to see my blog High density polyethylene sheets
ReplyDeleteThank you for providing this article. Through it, I gained some useful knowledge. Thank you for writing such a great post.
ReplyDeleteSwaraj Tractor Price
This article is well-explained and extremely helpful.
ReplyDeleteSwaraj Tractor Price
Nice article, very informative. This kind of content is helpful for anyone looking for a reliable solar solution in Karachi
ReplyDeleteYour content is very informative and well-written. It helped me understand the topic clearly. Thank you for sharing.
ReplyDeleteeicher 241
An Options Trading Course in Bhopal is ideal for traders who want to master derivatives trading with proper strategies and risk control. The course covers option basics, Greeks, option chain analysis, and practical strategies for different market conditions. With real-time market examples and expert guidance, learners develop confidence to trade options systematically and responsibly.
ReplyDeleteNice article! Content quality really matters when publishing online. I often use this Word Counter tool to quickly check word length and optimize my articles before publishing.
ReplyDeleteBuy a-pvp-crystals Online
ReplyDeleteBuy 4mmc crystal Online
Buy fentanyl hcl powder Online
Buy amphetamine powder Online
Buy blue crystal meth Online
Buy ketamine powder Online
Buy crystal meth ice Online
Buy crack cocaine Online
Buy fishscale cocaine Online
Buy 8 ball ofcocaine Online