
Granny Square Mermaid/Fish Tail Bag -free crochet pattern-

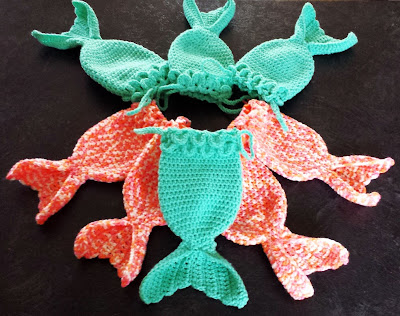
I love how versatile the granny square is, you can make just about anything! Mermaid tails are pretty popular right now, ever since the mermaid tail lapghan came about, and you may have already seen my little mermaid tail gift bags. Actually that's what inspired me to write this pattern, someone over at Ravelry had made my gift bag in a large format, and thinking "my daughter would love a big bag", but... I don't have enough yarn! If anyone looked at my yarn stash, they'd say I was crazy, because my bin is full (over-flowing!) But, it's ALL scrap yarn, various colors, fibers, textures, etc. Not enough of one yarn to complete a big project. So instead of heading out the yarn store, I decided to try to use some of this stash up, and try to make the bag in granny squares instead, so here it is!
Like I said, this is made from ALL scrap yarns! I made the big green bag first, I pulled out all of my green toned yarns. I wanted to make the bag in a worsted weight, and have a lot of sport and lightweight yarns, so I doubled them up to make it thicker. same as with the pink toned bag in this tutorial. There is no gauge for the pattern, for this reason. You will "guestimate" as you go, the width of one granny square from opposite ends (diamond shaped) will be the width of your bag.
You can use whatever yarn you want and whatever hook you want! Make as many rounds on the granny square as you need to achieve the size of bag you want! This is kind of more a tutorial than a pattern, but it's pretty simple. If you already have experience with the granny square, you could probably just look at the photos and know what's going on :)
Designed By: Farrah Hodgson
Skill Level: Easy
Materials:
- Yarn: Any (I used scraps to make a worsted weight)
- Hook: To match yarn (I used a 5.00mm/H hook)
- Yarn Needle to sew in ends
Size: Custom
 |
| My Scraps! |
THE PATTERN!
Make 4 Granny Squares - identical in size (Add or omit rounds to change size)
Ch5, sl st in 1st ch to form a loop.
Rnd 1: Ch5 (counts as 1dc and first ch2 space), [3dc-ch2 in loop] 3 times; 2dc in loop, sl st in 3rd ch of beginning ch5 to join.
Rnd 2: Sl st in 1st ch2 space; ch5, shell in same ch2 space; *(shell-ch2-shell) in next ch2 space** 3 times; 2dc in first ch2 space, sl st in 3rd ch of beginning ch5 to join(completes last shell).
Rnd 3: Sl st in 1st ch2 space; ch5, shell in same ch2 space; *shell in next space, (shell-ch2-shell) in next ch2 space** 3 times; shell in next space, 2dc in first ch2 space, sl st in 3rd ch of beginning ch5 to join.
Rnd 4: Sl st in 1st ch2 space; ch5, shell in same ch2 space; *(shell in next space) twice, (shell-ch2-shell) in next ch2 space** 3 times, (shell in next space) twice, 2dc in first ch2 space, sl st in 3rd ch of beginning ch5 to join.
Rnd 5: Sl st in 1st ch2 space; ch5, shell in same ch2 space; *(shell in next space) 3 times, (shell-ch2-shell) in next ch2 space** 3 times, (shell in next space) 3 times, 2dc in first ch2 space, sl st in 3rd ch of beginning ch5 to join.
Rnd 6: Sl st in 1st ch2 space; ch5, shell in same ch2 space; *(shell in next space) 4 times, (shell-ch2-shell) in next ch2 space** 3 times, (shell in next space) 4 times, 2dc in first ch2 space, sl st in 3rd ch of beginning ch5 to join.
Rnd 7: Sl st in 1st ch2 space; ch5, shell in same ch2 space; *(shell in next space) 5 times, (shell-ch2-shell) in next ch2 space** 3 times, (shell in next space) 5 times, 2dc in first ch2 space, sl st in 3rd ch of beginning ch5 to join.
..... and so on, add more rows for a larger size, omit rows for smaller size
Make TWO Granny Triangles (these are the fins)
- I went up to the round before my last round of the granny squares (example: 7 rounds in granny square, 6 rounds in granny triangles)
Ch5, sl st in 1st ch to form a loop.
Rnd 1: Ch5 (counts as 1dc and first ch2 space), [3dc-ch2 in loop] twice; 2dc in loop, sl st in 3rd ch of beginning ch5 to join.
Rnd 2: Sl st in 1st ch2 space; ch5, shell in same ch2 space; *(shell-ch2-shell) in next ch2 space** twice; 2dc in first ch2 space, sl st in 3rd ch of beginning ch5 to join(completes last shell).
Rnd 3: Sl st in 1st ch2 space; ch5, shell in same ch2 space; *shell in next space, (shell-ch2-shell) in next ch2 space** twice; shell in next space, 2dc in first ch2 space, sl st in 3rd ch of beginning ch5 to join.
Rnd 4: Sl st in 1st ch2 space; ch5, shell in same ch2 space; *(shell in next space) twice, (shell-ch2-shell) in next ch2 space** twice, (shell in next space) twice, 2dc in first ch2 space, sl st in 3rd ch of beginning ch5 to join.
Rnd 5: Sl st in 1st ch2 space; ch5, shell in same ch2 space; *(shell in next space) 3 times, (shell-ch2-shell) in next ch2 space** twice, (shell in next space) 3 times, 2dc in first ch2 space, sl st in 3rd ch of beginning ch5 to join.

-you can do anything here, or leave as is.... here's what I did...
- Ch1, turn; (working in front loops only) sc in each st over next two sides, leave the third side of the triangle unworked.
- Ch1, turn; sl st in 1st sc, (ch 3- skip next sc, sl st in next sc) repeat until last sc, sl st in last sc. Fasten off.


Now sew everything together! Fold the granny squares on the sides of the bag in half.


Border
Attach yarn to top corner of either side, with a slip stitch; ch1, (See note) sc in each stitch all of the way around the top....
*Note: I made ties in the center of mine, however you can add a button, clasp, whatever you want, however, .... as I was working sc sts around the top when I got the center of both sides; ch 41- sl st in 2nd ch from hook, and sl st in each of the next 39 chs; continue working sc sts around the border.

Ch 56
Row 1: sc in 2nd ch from hook, sc in next 54 chs. (55sc)
Rows 2-6: Ch1, turn; sc in next 55 sts.
Fasten off. Sew each end of the strap to the top of the bag.
Sew/Weave in all ends. Done!


I also made a wee tiny one using crochet thread and a 1.5mm hook :)


Comments
Post a Comment