
Venetian Hanging Plant Holder

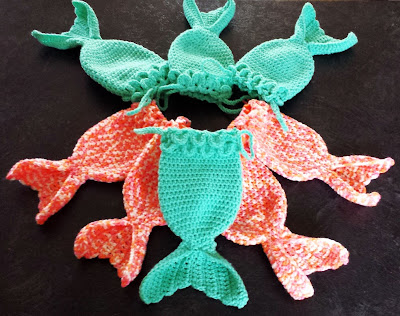
I have loved the Venetian Lace square for a very long time. There's SO much you can do with it. I will get into those other projects another day, but today I am going to show you my hanging plant holders!
It's a bit inspired by macrame, though I love crochet much more. This pattern can easily be adjusted to fit various different plant pots by adjusting your yarn (or thread) and hook. You are going to have to play with setting your gauge to get a specific size, but to be honest, I just winged it and both sizes that I made worked out perfect!
The first hanging plant holder I made, I used a size 3.5mm crochet hook and worsted weight size 4 cotton crafting yarn. Each square measures approximately 6 inches.
For the second plant holder, I used a size 2.00mm crochet hook and size 10 crochet thread. Each square measures about 4 inches.
Just remember that these will stretch!
The length of the straps is entirely up to you!
THE PATTERN - you will be making five squares and joining as you go. The straps are made all in one piece at the end by making simple chains and slip stitches. The tassel on the bottom is optional. (I used it on my big holder, but not on the small one)
So let's get going, first you have to learn how to make the Venetian Lace Square. (Already know how to make one? Awesome, this will be easy for you!)
Venetian Lace Square #1:
CENTRE:
Row 1: Ch 19, dc in 7th ch from hook, (ch2, skip next 2 chs, dc in next ch) 4 times.
Rows 2-5: Ch5, turn (counts as 1dc and ch2); skip 2 chs, dc in next st, (ch2, skip 2 sts, dc in next st) 4 times.
Do not fasten off.

SIDES
Side 1:
Row 1: Ch1, working in the dc/ch2 spaces to the left, work 4sc in next 4 spaces; leave the remaining space unworked.

Row 2: Ch12, turn; (Wrong Side Facing) skip over 11 sc, sl st in next sc.

Row 3: Ch1, turn; (Right Side Facing) work 3sc in ch 12 space, (ch3-this is a picot-, 3sc) in ch12 space, 5 times, work 4sc in the remaining dc/ch2 space from Row 1.

Row 4: Ch9, turn; (Wrong Side Facing), (skip over next picot and sl st in next picot) twice, ch9, skip over last picot and sl st in the very last sc at the corner.

Row 5: Ch1, turn; (Right Side Facing), [4sc in ch9 space, (picot, 4sc in ch 9 space) 3 times], repeat [ to ] for next 2 ch9 spaces. Do not fasten off.

Sides 2-4: Repeat instructions for first side.


Fasten off.
Now you will be making 4 more Venetian Squares, but joining as you go.
Square 2:
Follow same instructions as Side 1, up until the 3rd side. You will be joining the 3rd and 4th side to Square 1 as follows:

Work the first loop of three as usual.
Second loop: work the 1st picot as usual, work the next two picots into the matching picots from Side 1. Instead of ch3; --ch1, sl st into the adjoining picot from Side 1, ch1--.
Third loop: Work joining picots for the next 2 picots, work the third picot as usual (unjoined).

3rd Side Complete

4th Side: Work 1st picot unjoined, join next 2 picots from the first loop, join next 2 picots from the second loop, work 3rd picot unjoined of second loop, work third loop all picots unjoined.
Make and join the 3rd square same as second square.

Now for the Fourth square, you are joining ALL sides! Work and join the first two sides as you did the last 2 squares.

Now join the 3rd and 4th sides of square 4 into the very first 2 sides from Square One! This makes the sides to the plant holder.

flat view

top view
Fifth Square: Now this one gets a little tricky! You are joining all sides to the bottom sides of the first 4 squares. Just pay attention to where you're joining and all we be ok! Match picot to picot, and keep an eye out for the picots that don't join (these are the ones on each side of the tips of the centre squares or diamonds)
Then I went camping.........
And worked on it there......

all 4 sides joined to the bottom!
STRAPS:
The straps are all worked in one piece! For the large holder, I chained 91, and the small one, I chained 151.
Side 1: Ch 91 (151)** chain however long you want your straps**, The extra chain is your turning chain; join to the top of any square, in the 3rd picot from the diamond tip.

Slip stitch back up 25 stitches; ch25, skip over 2 picots, and join in the next picot to the left.

Slip stitch back up 25 chs, chain in remaining chains all of the way back to where you started. DO NOT FASTEN OFF!!!

Sides 2-4: Repeat instructions for First Strap. (There are 4 picots between each set of straps)


The long chains meet at the top.
When all 4 sides are complete, sl st in the very first st and fasten off!
Sew in ends.

Tassel (Optional): Cut strands of yarn double length, because you will fold them over. Cut as many as you like, and tie them into the very centre of the bottom square. I made one strand of yarn a lot longer and used that strand to wrap neatly around the other strands. I also frayed the strands apart by pulling the plies of yarn apart and combed them.

I hope you enjoyed the pattern! THE END


Comments
Post a Comment