
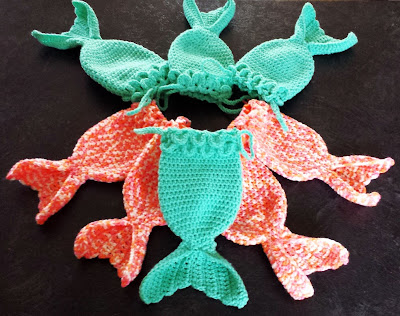
Rows of Cables Boot Slippers -free crochet pattern-

I can't take full credit for this pattern! This is a "re-make" of my mother's pattern, Cabled Boot Slippers. I love the look of cables, boots, and slippers; and love the original pattern, however, the yarn I was using did not match the pattern gauge so I had to change it up a bit.
The original uses double strands of Red Heart Super Saver worsted, and I've been using Red Heart Comfort worsted. Both are worsted, but there's quite a difference! My yarn, double stranded, made the original pattern come out way too big! I tried dropping my hook size, it seemed to help for size, but it was really hard on my hands as the tension was so tight. I wasn't letting this pattern go, so I had to re-think the process!
So now using one strand of worsted yarn, I was able to re-write the pattern. They are not as chunky as the original and have a couple extra cable rows for length. But the basic concept is the same! These slippers would fit a size medium/large foot, 7-9 US shoe size, as they're quite stretchy. I haven't had time to play around with other sizes yet. If you're looking for something heavier and quicker, go check out the original pattern!
Designed By: Susan Norrad, re-written by Farrah Hodgson
Skill Level: Intermediate
Materials:
- Red Heart Comfort, Worsted (4), approx 792m (867 yds), Multicolors: approx. 593m (649 yrds), ONE BALL WILL MAKE 3 pairs of slippers.
- Size 5.0mm (H) crochet hook
- Yarn Needle to sew in ends
Size: Women's medium foot, US shoe size 7-9
Finished Measurements: Length of sole= approx. 10 inches; Height from ankle up= approx. 7 inches
Gauge: 14sc and 14 rows = 4 inches
Stitches Used:
ch - chainsl st - slip stitch
sc - single crochet
hdc - half double crochetdc - double crochet
tog - together
fpdc - front post double crochet
bpdc - back post double crochet
Special Term Used:
Fpdc cable twist- Skip first and 2nd post sts, fpdc around 3rd post st, fpdc around 4th post st, fpdc around first skipped post st, fpdc around 2nd skipped post st.
Body of Slipper:

----------------------------------------------------------------------------
THE PATTERN
Sole:
Ch 8
Row 1: 2 sc in 2nd ch from hook, sc in next 5 chs, 2 sc in last ch. (9 sc)
The rest of the rows are through the back loops of the sts only.
Row 2: Ch1, turn; 2 sc in first sc, 1 sc in next 7 sc, 2 sc in last sc, ch 1, turn. (11 sc)
Row 3: Ch1, turn; 2 sc in first sc, 1 sc in next 9 sc, 2 sc in last sc. (13 sc)
Rows 4 to 18: Ch1, turn; 1 sc in each st, (13 sc)
Row 19: Ch1, turn; sc2tog, sc in next 9 sc, sc2tog. (11 sc)
Rows 20 to 31: Ch1, turn; sc in next 11 sc.
Row 32: Ch1, turn; sc2tog, 1 sc in next 7 sc, sc2tog. (9 sc)
Row 33: Ch1, turn; (sc2tog) twice, sc in next sc, (sc2tog) twice. (5sc)
Row 34: Ch1, turn; sc2tog, 1 sc in next sc, sc2tog. (3 sc)
Next, you are going to crochet all around the sole of the slipper.
-Ch1, turn; Slip stitch in first sc, slip stitch and ch 1, and 1 sc in next st, 1 sc in next st.
-Make 1 sc at the end of each row along side of sole (you now have 36 sc).
-Place 7 sc across the back of the starting chain, ( you now have 43 sc).
-Place 1 sc at the end of each row along other side of sole (you now have 77 sc).
-1 sc in first slip stitch you made at the beginning, sl st to join to the starting sc. (Total = 78 sc)
Body of Slipper:
Tip: When joining each row, alternate by joining to the joining st for one row, and by joining to the first sc for the next row, etc. This keeps the back seem in a straight line.
Row 1: Ch1, turn; Through the back loops only, 1 sc in each sc to end of Row, sl st to join. (78 sc)
Rest of the rows are through both loops.
Rows 2-4: Ch1, do not turn; 1 sc in each st, sl st to join. (78 sts)
Row 5: Ch1, do ot turn; 1 sc in 34 sc, (sc2tog) twice, sc in next 2 sc, (sc2tog) twice, 1 sc in 34 sc, sl st to join. (74 sc)
Row 6: Ch1, do not turn; 1 sc in 32 sc, (sc2tog) twice, 1 sc in next 2 sc, (sc2tog) twice, 1 sc in 32 sc, sl st to join. (70 sc)
Row 7: Ch1, do not turn; 1 sc in 28 sc, (sc2tog, sc in next 2 sc) 3 times, 2 sc tog, 1 sc in next 28 sts, sl st to join. (66 sc)
Row 8: Ch1, do not turn; 1 sc in first sc, sc2tog, 1 sc in 25 sc, skip next sc, dc2tog four times, skip next sc, 1 sc in next 25 sc, sc2tog, 1 sc in last sc, sl st to join. (58 sc)
Row 9: Ch1, do not turn; 1 sc in first sc, sc2tog, 1 sc in 21 sc, skip next sc, dc2tog four times, skip next sc, 1 sc in next 21 sc, sc2tog, 1 sc in last sc, ss to join, ch 1, do not turn. (48 sc)
Row 10: Ch1, do not turn; 1 sc in 20 sc, skip next sc, dc2tog four times, skip next sc,1 sc in next 20 sc, sl st to join.(44 sc)
Row 11: Ch1, do not turn; 1 sc in 17 sc, skip next sc, dc2tog four times, skip next sc, 1 sc in next 13 sc, sl st to join. (38 sc)
Row 12: Ch1, do not turn; 1 sc in 16 sc, skip next st, dc2tog twice, skip next st, 1 sc in next 16 sc, sl st to join. (36 sc)
Row 13: Ch1, do not turn; 1 sc in 15 sc, skip next st, 1 dc in next 2 dc, skip next st, 1 sc in next 15 sc, sl st to join. (32 sc)
Slipper Top:
Tip: Be sure to make your first st in the first st and not in the slip stitch where you joined.
Row 1: Ch1, turn; hdc in 1st st, (1 hdc in next 2 sts, 2 hdc in next st) 10 times, hdc in last st, sl st to join. (42 sts)
Row 2: Ch1, turn; 1 hdc in first 2 sts, (fpdc in next 4 sts, 1 hdc in next 3 sts) 5 times, fpdc in next 4 sts, 1 hdc in last st, sl st to join.
Row 3: Ch1, turn; 1 hdc in next st, (bpdc in next 4 sts, 1 hdc in next 3 sts) 5 times, bpdc in next 4 sts, 1 hdc in last 2 sts, sl st to join.
Row 4: Ch1, turn; 1 hdc in next 2sts, fpdc Cable Twist over next 4 sts, (1 hdc in next 3 sts, fpdc Cable Twist over next 4 sts) 5 times, 1 hdc in last st, sl st to join.
Row 5: Repeat Row 3.
Row 6: Repeat Row 2.
Row 7: Repeat Row 3.
Row 8: Repeat Row 4
Row 9: Repeat Row 3.
Row 10: Repeat Row 2.
Row 11: Repeat Row 3
Row 12: Repeat Row 4
Row 13: Repeat Row 3
Row 14: Repeat row 2
Row 15: Repeat Row 3
Row 16: Repeat Row 4
Row 17: Repeat Row 3
Row 18: Repeat Row 2
Row 19: 1 sc in each st, sl st to join, fasten off.


Beautiful, May we have a video turtorial if possible mine did not come out perfect
ReplyDeleteLove
Busi
Excellent knowledge, You are providing important knowledge. It is really helpful and factual information for us and everyone to increase knowledge. Continue sharing your data. Thank you. Read more info about rossi shoe service
ReplyDelete