Lacy Arm Coverings
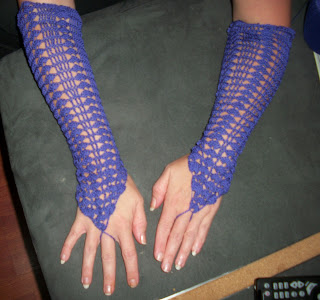
Cuffs, armlets, wristers, these arm coverings can be called by several names. I've been seeking a lacy style pattern, and after many hours searching, I ended with nothing. Therefore, I decided to whip up my own. These long lacy crochet arm cuffs are elegant and have a vintage vibe, exactly what I was looking for!
A great way to keep your arms warm (but not too warm) this fall and look stylish too! I would love to share my pattern with you.
This pattern is owned and copyrighted for Fintage Vintage, 2012. You may make these for your own personal use and for selling at live events such as craft fairs and markets. Online selling or copying of this pattern or the finished product is not allowed.
Designed By: Farrah for Fintage
Skill Level: Intermediate
Yarn: Aunt Lydia's Crochet Thread size 10 (I used color Violet)
Hook: Size 2.0mm
Size: Womens' One size fits all
Abbreviations Used:
Rnd=round
Ch=chain
st=stitch
sts=stitches
sl st=slip stitch
beg=beginning
sc=single crochet
dc=double crochet
tr=treble or triple crochet
Special Term Used: Shell=skip 3 sts, 7dc in next stitch, skip 3 sts
PATTERN
Ch 25, sl st to 1st ch to form a loop. Ch2. Do not turn.
Rnd 1: 9 dc in the 1st ch. Ch3. Turn.
Rnd 2: Tr in the 1st dc, shell, tr in next dc, ch3. Turn.
Rnd 3: 9tr 1st st, shell, 9tr in last st. Ch3. Turn.
Rnd 4: Tr in 1st st, (shell, tr in next st)3 times. Ch3. Turn.
Rnd 5: 9tr in 1st st, (shell, tr in next st)twice, shell, 9tr in last st. Ch3. Turn.
Rnds 6 and 7: Tr in 1st st, (shell, tr in next st)4 times, shell, tr in last st. Ch3. Turn.
Rnd 8: Tr in first st, (shell, 2tr in next st)4 times, shell, tr in last st. Ch3, Turn.
Rnd 9: Tr in first st, (shell, tr in next 2 sts)4 times, shell, tr in last st. Join to opposite side by working a sl st to the top of the 1st tr of row. DO NOT TURN.
Do not turn from now on.
Rnds 10 to 13: Tr in 1st st, (shell, tr in next 2 sts)4 times, shell, tr in last st. sl st to beg tr. Ch3.
Rnd 14: Tr in 1st st, (shell, tr in next st, 2tr in next st)4 times, shell, tr in last st. Sl st to beg tr. Ch3.
Rnds 15 to 17: Tr in 1st st, (shell, tr in next 3 sts)4 times, shell, tr in last st. Sl st to beg tr. Ch3.
Rnd 18: 2tr in 1st st, (shell, tr in next st, 2tr in next st, tr in next st)4 times, shell, tr in last st. Sl st to beg tr. Ch3.
Rnds 19 and 20: tr in first 2 sts, (shell, tr in next 4 sts)4 times, shell, tr in last st. Sl st to beg tr. Ch3.
Rnd 21: Tr in first 2 sts, (shell, tr in next 2 tr, 2tr in next tr, tr in next tr)4 times, shell, 2 tr in last tr. Sl st to beg tr. Ch3.
Rnd 22 and 23: Tr in first 2 tr, (shell, tr in next 5 tr)4 times, shell, tr in last 2 tr. Sl st to beg tr. Ch3.
Rnd 24: tr in 1st tr, 2tr in next tr, (Shell, tr in next 2 tr, 2tr in next tr, tr in next 2 tr)4 times, shell, tr in last 2 tr. Sl st to beg tr. Ch3.
Rnds 25 and 26: Tr in 1st 3 tr, (Shell, tr in next 6 tr)4 times, shell, tr in last 2 sts. SL st to beg tr. Ch3.
Rnd 27: Tr in 1st 3 sts, (Shell, tr in next 2 sts, 2tr in next st, tr in next 3 sts)4 times, shell, 2tr in next st, tr in last st. Sl st to beg tr. Ch3.
Rnds 28 and 29: Tr in 1st 3 sts, (shell, tr in next 7 sts)4 times, shell, tr in last 3 sts. Sl st to beg tr. Ch1.
Rnd 30: sc in each st around (70sc)
Fasten off.
Sew in ends.
A great way to keep your arms warm (but not too warm) this fall and look stylish too! I would love to share my pattern with you.
This pattern is owned and copyrighted for Fintage Vintage, 2012. You may make these for your own personal use and for selling at live events such as craft fairs and markets. Online selling or copying of this pattern or the finished product is not allowed.
Designed By: Farrah for Fintage
Skill Level: Intermediate
Yarn: Aunt Lydia's Crochet Thread size 10 (I used color Violet)
Hook: Size 2.0mm
Size: Womens' One size fits all
Abbreviations Used:
Rnd=round
Ch=chain
st=stitch
sts=stitches
sl st=slip stitch
beg=beginning
sc=single crochet
dc=double crochet
tr=treble or triple crochet
Special Term Used: Shell=skip 3 sts, 7dc in next stitch, skip 3 sts
PATTERN
Ch 25, sl st to 1st ch to form a loop. Ch2. Do not turn.
Rnd 1: 9 dc in the 1st ch. Ch3. Turn.
Rnd 2: Tr in the 1st dc, shell, tr in next dc, ch3. Turn.
Rnd 3: 9tr 1st st, shell, 9tr in last st. Ch3. Turn.
Rnd 4: Tr in 1st st, (shell, tr in next st)3 times. Ch3. Turn.
Rnd 5: 9tr in 1st st, (shell, tr in next st)twice, shell, 9tr in last st. Ch3. Turn.
Rnds 6 and 7: Tr in 1st st, (shell, tr in next st)4 times, shell, tr in last st. Ch3. Turn.
Rnd 8: Tr in first st, (shell, 2tr in next st)4 times, shell, tr in last st. Ch3, Turn.
 |
| Increasing tr |
 |
| joining |
Rnds 10 to 13: Tr in 1st st, (shell, tr in next 2 sts)4 times, shell, tr in last st. sl st to beg tr. Ch3.
Rnd 14: Tr in 1st st, (shell, tr in next st, 2tr in next st)4 times, shell, tr in last st. Sl st to beg tr. Ch3.
Rnds 15 to 17: Tr in 1st st, (shell, tr in next 3 sts)4 times, shell, tr in last st. Sl st to beg tr. Ch3.
Rnd 18: 2tr in 1st st, (shell, tr in next st, 2tr in next st, tr in next st)4 times, shell, tr in last st. Sl st to beg tr. Ch3.
Rnds 19 and 20: tr in first 2 sts, (shell, tr in next 4 sts)4 times, shell, tr in last st. Sl st to beg tr. Ch3.
Rnd 21: Tr in first 2 sts, (shell, tr in next 2 tr, 2tr in next tr, tr in next tr)4 times, shell, 2 tr in last tr. Sl st to beg tr. Ch3.
Rnd 22 and 23: Tr in first 2 tr, (shell, tr in next 5 tr)4 times, shell, tr in last 2 tr. Sl st to beg tr. Ch3.
Rnd 24: tr in 1st tr, 2tr in next tr, (Shell, tr in next 2 tr, 2tr in next tr, tr in next 2 tr)4 times, shell, tr in last 2 tr. Sl st to beg tr. Ch3.
Rnds 25 and 26: Tr in 1st 3 tr, (Shell, tr in next 6 tr)4 times, shell, tr in last 2 sts. SL st to beg tr. Ch3.
Rnd 27: Tr in 1st 3 sts, (Shell, tr in next 2 sts, 2tr in next st, tr in next 3 sts)4 times, shell, 2tr in next st, tr in last st. Sl st to beg tr. Ch3.
Rnds 28 and 29: Tr in 1st 3 sts, (shell, tr in next 7 sts)4 times, shell, tr in last 3 sts. Sl st to beg tr. Ch1.
Rnd 30: sc in each st around (70sc)
Fasten off.
Sew in ends.


beautiful.
ReplyDeletethanks for sharing the pattern.
These are lovely! Have you ever made them in a fingerless style where they cover the hand?
ReplyDeleteI haven't, but it would be easy, I think, once you get the groove of the shells and how they work, you could easily make it work:) I originally made these for a masquerade. I have made them in full gloves as well though! It's long and tedious!
DeleteThese are just beautiful! Thanks for the free pattern! :)
ReplyDeleteThank you! These are so pretty, and I can hardly wait to get started on a pair! :)
ReplyDeleteI love this pattern!
ReplyDelete